
v2212: New and improved pre-processing
TOP
The checkMesh utility now includes:
- manifoldness checks for patches and faceZones across processor boundaries; and
- reporting of overlapping pointZones, faceZones, and cellZones.
Parallel consistent manifold reporting
The -allTopology switch reports the topology of patches and faceZones, e.g.:
Checking patch topology for multiply connected surfaces...
    Patch               Faces    Points   Surface topology
    fixedWalls          80       160      ok (non-closed singly connected)
    frontAndBack        800      882      ok (non-closed singly connected)
In previous versions this check was disabled in parallel. In v2212 the edge connectivity is checked across processor boundaries:
Checking patch topology for multiply connected surfaces...
    Patch               Faces    Points   Surface topology
    fixedWalls          80       164      ok (non-closed singly connected)
    frontAndBack        800      924      ok (non-closed singly connected)
Note that:
- the point connectivity check 'multiply connected (shared point)' is [still] not parallel consistent, and
- the number of points represents the sum of all points, this does not compensate for duplicates.
Overlapping zones
The -allTopology switch now reports overlapping zones since these are only supported by a few utilities. An example checkMesh output follows:
Checking topology...
    Boundary definition OK.
--> FOAM Warning :
    From virtual bool Foam::zone::checkDefinition(Foam::label, bool) const
    in file meshes/polyMesh/zones/zone/zone.C at line 199
    Zone c0 contains duplicate index label 0
Source code
TOP
The changeDictionary utility can now operate on collated processor directories in parallel, e.g.
mpirun -np 2 changeDictionary -parallel -fileHandler collated
This is very convenient to e.g. slightly modify boundary condition settings without having to re-decompose the case.
See:
- Issue #2533
Source code
TOP
Currently, snappyHexMesh refinement is based on the intersection of rays between neighbouring cells. Features are identified by interpreting the intersection angle and local normal at the intersection points. This is determined by the resolveFeatureAngle parameter.
Surface-based refinement
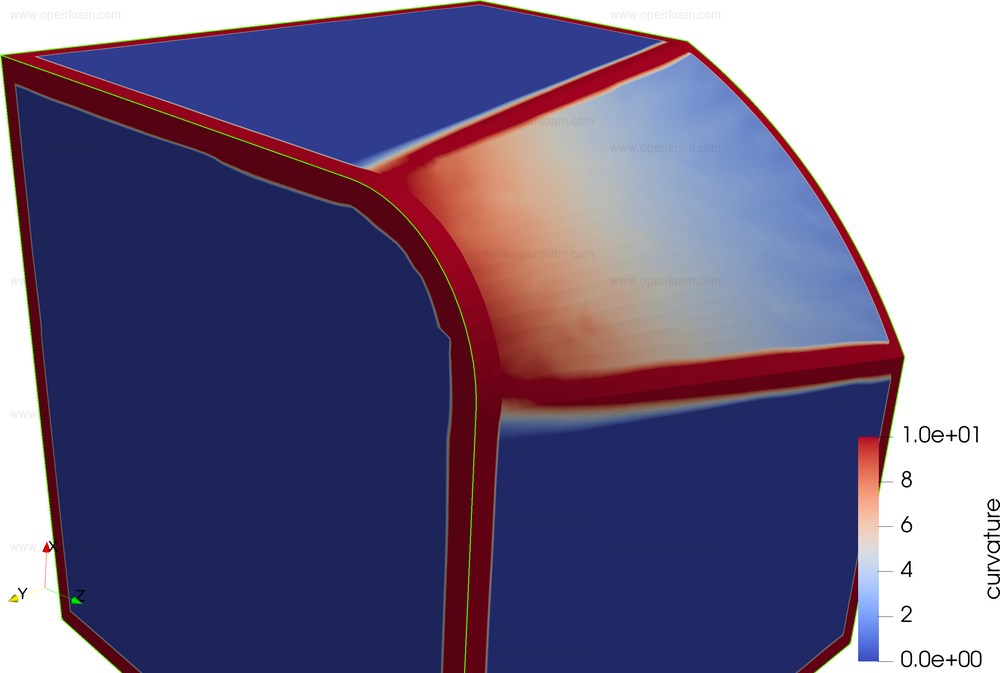
Curvature-based refinement has been extended to query the actual (triangulated) surface. In the figure below, a typical surface is shown coloured by the measured curvature (blue-white-red scale) and any 45 degree feature angles (in green):
The curvature can be written using the surfaceFeatureExtract application by including the entries in its input dictionary:
// Output surface curvature
curvature true;

// Write closeness/curvature/proximity fields as VTK for postprocessing
writeVTK            yes;
This will write a .vtp file that includes the input geometry and the curvature field. The algorithm in snappyHexMesh pre-calculates the required refinement level for each triangle on the surface, and uses the information to trigger refinement during castellation. The behaviour is controlled by the resolveFeatureAngle parameter and the new, optional, curvatureLevel parameter:
// Additional refinement for regions of high curvature. Expressed
// (bit similar to gapLevel) as:
// - number of cells per radius of curvature. (usually a few is
//   good enough)
// - starting cell level? Not used at the moment.
// - maximum cell level. This can be smaller or larger than the
//   max 'surface' level
// - minimum curvature radius to ignore (expressed as a cell level).
//   This can be used to avoid detecting small sharp surface
//   features. Set to -1 to ignore.
//
curvatureLevel (10 0 10 -1);
The procedure comprises:
- calculate the curvature of the surface
- unmark points on edges with angles sharper than resolveFeatureAngle (these are resolved by feature-edge snapping)
- convert the curvature and specified number-of-cells-per-radius to a needed refinement level
- clip to the specified maximum refinement level
- store on the surface such that it gets used during follow-on refinement
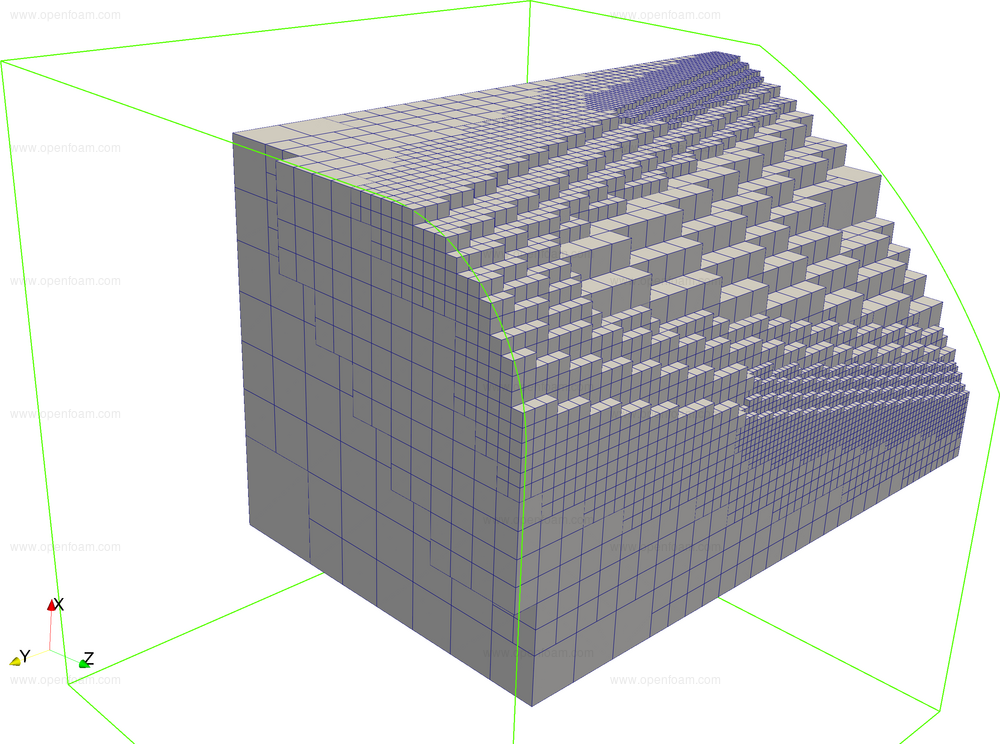
An example mesh for the surface shown above (starting from a single initial cell):
This shows the correct behaviour on the front where the (gradual) curvature of the surface causes additional refinement. However, unwanted refinement at the far-side of the surface is evident, resulting from the sharp angle (approx. 20 degrees). Here, the 'minimum curvature radius' could be useful, but appropriate values are non-trivial to determine.
Additional testing
It can be beneficial to limit curvature refinement to particular regions. One approach is to extract part of the surface, e.g. using surfaceSubset or subTriSurfaceMesh surface. Another is to use the limitRegions functionality inside snappyHexMesh:
limitRegions
{
    box_limit    // geometry defining region without explicit refinement
    {
        // Don't refine at all inside 'box_limit'
        mode        inside;
        levels      ((10000 0));
    }
}
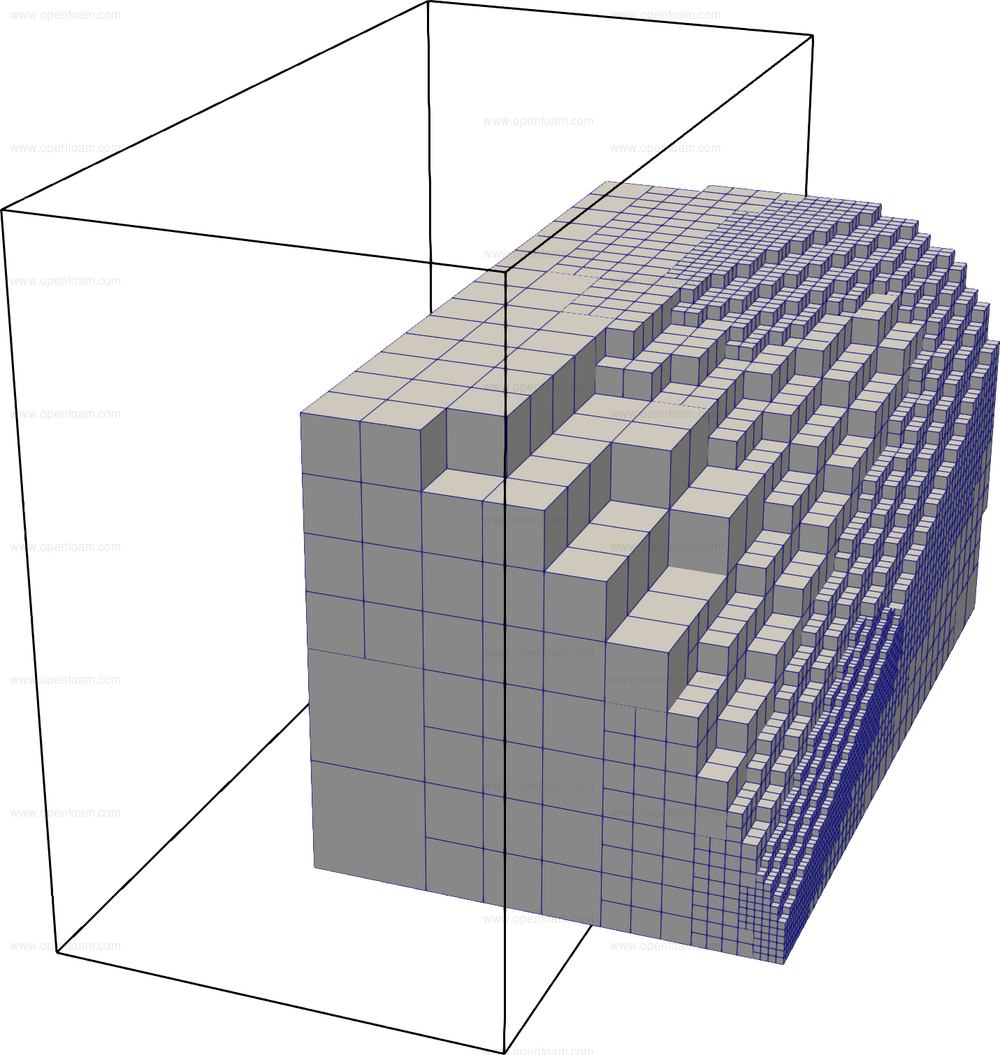
In the tutorial mesh/snappyHexMesh/block_with_curvature this has been used to limit the curvature refinement to outside a box (shown with black lines):
Note the 'bleeding' of the refinement due to the 2:1 constraint.
TOP
The setFields utility has been extended to include finite-area support. An example input:
defaultFieldValues
(
    areaScalarFieldValue h 0.00014
);

regions
(
    clipPlaneToFace
    {
        point  (0 0 0);
        normal (1 0 0);

        fieldValues
        (
            areaScalarFieldValue h 0.00015
        );
    }
);
If needed, it is also possible to temporarily suppress handling with the command-line option:
setFields -no-finite-area
Tutorial
TOP
The clipPlane topo-sets clipPlaneToCell, clipPlaneToFace and clipPlaneToPoint, provide a convenient means of selecting regions. For example,
clipPlaneToFace
{
    point  (0 0 0);
    normal (1 0 0);
}
is easier than defining a semi-infinite bounding box (as was previously the only possibility):
boxToFace
{
    min  (0  -1e6 -1e6);
    max  (1e6 1e6 1e6);
}
Tutorial